
A Simple Gravity Drain For Dragon Strand Drainage Trays
What is a Gravity Drain?
The standard methods of draining your drainage tray include evaporation and using a wet/dry vac to suck out the water. But what if you would like to have it just drain into a bucket below the cage and then just empty the bucket every week or two? This is actually quite simple to do with standard 1/4″ drip irrigation parts. Although, it does take some careful drilling skills! All these parts are available at your nearest home improvement store, but there is an Amazon shopping list at the end of this article in case you would like the convenience of tacking it on to an order you were planning on doing anyways.
Parts for a Gravity Drain.
Note: As an Amazon Associate I earn from qualifying purchases.
It is quite easy to install a gravity drain that will allow water to flow into a bucket under your cage. A drain with the common drip system 1/4” tubing (the same tubing used with most misting systems) will be good for draining water only. (If you end up with feeders and such in the drain tray then you might want to jump to the 1/2” drip system tubing.)
1/4″ Drip Irrigation Elbow
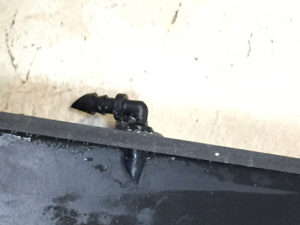
Not all version of drip irrigation elbows have the flanges that will give you a surface to glue against. Carefully select which manufacturer you use!
I start with finding a 1/4″ elbow (or 90º angle) for drip irrigation. A straight coupler may be used, but my set-ups on racks and such benefit from having the drainage line run parallel to the cages. These can be installed anywhere on the drainage tray. I prefer to have it come out the back. Often people chose to have it come out the bottom. While this makes logical sense, the back works best for me using these materials because this keeps the elbow out of the way if I have to move the tray.
This can be done with 1/2″ tubing, but I find that is not necessary, at least with my situation.
Not all elbows are designed the same. I prefer elbows that have a flange which gives me a large gluing surface.
1/4″ Drip Irrigation Tubing
If you have a misting system then you probably already are familiar with 1/4″ drip irrigation tubing. The tubing used by Mist King or Cli-Mist is the exact same. The 1/4″ tubing comes in rolls of 50′ or 100′. No matter how small my project, having this tubing around in case I need to reroute my misting system or such has been wonderful so do not fret about having to buy extra footage!
Other 1/4″ Couplers
An advantage of using 1/4″ tubing is that there are other couplers easily found. From Ts to straight couplers to even valves, there are many options for you to connect drainage trays or create any configuration your situation requires.
Installing a Gravity Drain.
The first thing to do is drill a hole in the place you want your drain. Here are some considerations.
Drill Bit Size. I drill a hole in the side wall of the drainage tray as close to the bottom as possible. Watch out for lips on the tray! Sometimes the bottom edge of the side is not the bottom of the tray! Drill a hole with a bit just barely big enough to fit the barb through, but not big enough to fit the flange through. I’ll not give drill bit sizes here because they will all be different depending on what size and brand drip fitting you get.\
Hole Placement. Be very careful that the placement of the hole allows the entire elbow piece to sit above the floor of the tray. There is a lip on the bottom of the tray and the floor is actually slightly above the edge. Before you drill your hole, study the area and mark with a pencil where you want to drill. You want to make the hole as close to the floor as possible, but definitely above the floor! If the hole is just small enough that you struggle to push the elbow in that is a good thing.

Glue Seal. Be generous with the glue. Once the elbow is pushed in, you will line the flange and surrounding area with Super Glue and put the two pieces together. I use the gel version of the glue which does not run. It allows me to make sure the coverage is solid before hardening. The key to making a water proof seal is to make sure there is ample glue all around the opening to seal it off. Do not be shy in applying the glue.
Look for the Gel version of whatever super glue type brand you are looking at. The gel is more viscous and will help fill in gaps that may exist to make the seal waterproof.
Patience. Do not try to push the 1/4″ tubing on before the glue is fully dry. I give my seals 24 hours to dry.
Apply Heat. You will need enormous pressure to force the tubing over the barb of the elbow. Heating the tubing makes this much easier. To do this, microwave a cup of water until it is very hot. The actual temperature isn’t important. I put a cup of water in for two minutes. Soak the end inch of the tubing in the hot water for 30 seconds to soften it up. Once it is soft, the tubing will go over the barb and will cool in place creating a nice, water tight connection.
Once the glue gel has hardened, test the water tight nature by dumping in a couple gallons of water. Block the drain and see if the glued area leaks. If the seal is good then just attach a length of tubing to the output and lead it to a bucket.
An option that makes sense if you installed this fitting in the back is to also attach a length of tubing on the inside of the tray that takes water from the front of the drainage tray. This allows you easy access to the intake in case it needs unclogging. Just remember that to be an effective gravity drain the entire length of tubing needs to be below the level of the elbow. I also like to wrap the intake with a small piece of cloth to keep any stray chunks of matter from getting into the tube and clogging it.
There are a variety of fittings that can be used including straight couplers and even on/off valves if you would like to be able to control the flow. Of course, you are free to place the drain hole anywhere that best suits your design.
1/4” (or 1/2”) drip system components and the Super Glue Gel presented here are represented at just about any home improvement store and are the easiest of the many solutions, but clicking on these links will send you to suitable parts on Amazon.
Shopping List
1/4” (or 1/2”) drip system components and the Super Glue Gel presented here are represented at just about any home improvement store and are the easiest of the many solutions, but clicking on these links will send you to suitable parts on Amazon.
90º Elbow
For the actual piece that comes out the back I like to use elbows. Straight couplers could work, but for the bend required to daisy chain multiple drainage trays together or to simply go down to drain in the bucket I just go for a corner. These usually come in bags of 10 to 50 or 100. I specifically look for ones that have some sort of flange that the glue can grab hold. I use elbows for 1/4″ tubing
1/4″ Tubing
Very basic. Not many ways of going wrong when shopping for 1/4″ drip irrigation tubing.
Glue
There is a special consideration to get the “Gel” version of whatever super glue variety you get. The gel versions are much more viscous and could fill in the minute gaps that may exist between flange and drainage tray side wall.
Other Couplings
When using 1/4″ tubing there are a rich number of other couplings that can be used depending on what you need for your particular situation.
1/2″ System
The same strategy can be used with 1/2″ tubing. You can use this if you need more flow. The components are more expensive, but still readily available.