Large Atrium Build Guide
Introduction
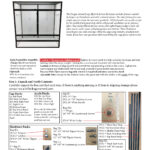
This build guide helps put together the items necessary to complete the set-up for the Large Atrium cage. The screen and hybrid versions of the Large Atrium are almost identical in set-up. The difference will be in what you will need to do to create and maintain the environmental conditions of your choice.
In this build guide I will be building the Large Hybrid Atrium and placing it on a 5′ wide baker’s rack on wheels. I chose this configuration because of the convenience of being able to have a wire shelf above the cage where I can place lights, foggers, and drippers. When trying to create the internal environment we need to be careful with the light sources we are using. Heat and UVB lamps are beyond safe levels the first few inches away from the bulb so it is necessary to raise the lamps above the surface of the cage top depending on how strong your UVB and heat bulbs are. The wire baker’s racks have provided an easy way to do this.
Assembly Instructions
This build guide helps put together the items necessary to complete the set-up for the Large Atrium cage. The screen and hybrid versions of the Large Atrium are almost identical in set-up. The difference will be in what you will need to do to create and maintain the environmental conditions of your choice.
In this build guide I will be building the Large Hybrid Atrium and placing it on a 5′ wide baker’s rack on wheels. I chose this configuration because of the convenience of being able to have a wire shelf above the cage where I can place lights, foggers, and drippers. When trying to create the internal environment we need to be careful with the light sources we are using. Heat and UVB lamps are beyond safe levels the first few inches away from the bulb so it is necessary to raise the lamps above the surface of the cage top depending on how strong your UVB and heat bulbs are. The wire baker’s racks have provided an easy way to do this.
Enclosure Variants
The Large Atrium is a high end cage that is meant to be a functional showpiece. It will provide an excellent home for your chameleon and, at the same time, look good sitting in your living room.
This cage includes eight Dragon Ledges and three Hydration Mounts that will allow mounting mist nozzles anywhere along the inside of the top frame.
The Drip Easy Drainage Tray may be ordered at the same time and bundled with the cage to save on shipping.
The Large Atrium comes in two version: Screen and Hybrid.
The screen version has sides, top, and front screen and a white PVC back. The white PVC back acts as a guard to keep misting from getting outside the cage and damaging the home walls and furniture. The screen version can be used where your ambient conditions are close to what your chameleon needs. Any heat or humidity addition to the cage will dissipate quickly.
The hybrid version has white PVC sides and back and a screen front.
Drainage Solutions
When deciding where to place the cage keep in mind that you will need some solution for the drainage of water that flows through the cage. Any use of the mister will produce water that has to go somewhere. The cage is specifically designed to work with a drainage tray so it is not watertight. Water that goes to the bottom of the cage will seep out. It was designed that way so that waste water would have as little contact with any fecal matter or escaped feeder insects as possible. You want to keep these separate. Even if you are trying out a “fogger only” hydration routine, you will still be watering the plants and water will drain out of the appropriately named drainage holes. So you must have a plan for where the water goes. Some people place their cages in greenhouse so do not need a drainage tray and some people build their own cage base. If you would like to purchase a drainage solution you can purchase the Large Atrium Drainage Tray.
The Large Atrium Drainage is watertight.
The Drainage tray is used if you want to collect the water underneath the cage and either let it evaporate out, suck it out with a wet/dry vacuum, or create a gravity drain of your own design.
Large Screen Atrium Enclosure
Large Hybrid Atrium Enclosure
Large Screen Atrium Enclosure with Drainage Tray
Large Hybrid Atrium Enclosure with Drainage Tray
What do I put the cage on?
On of the first items to consider when looking at the Large Atrium is where you will put it in your home. Depending on the configuration you choose, your footprints are as follows:
Cage Footprint: 45″ x 23.75″
Drainage Tray Footprint: 48″ x 25″
If you are keeping a chameleon, try to place the cage so that the top basking branch is the level of your eyes or higher. Height is security for chameleons.
In this build I will use a wire rack that is 60″ wide x 24″ deep x 72″ high and on wheels. Building out this cage on a wire rack allows me to have a shelf above the cage to place lights and a space below the cage to keep a water reservoir. And once you have a cage on wheels you will never go back. The convenience of being able to get to the backside to check something out or get that escaped cricket that chirps at 2AM is priceless. Especially at 2AM.
Wire accessory baskets are available to be able to hold the fogger and plants to make for a nice appearance.
I have a purchase link for the rack that I use, and the basket, below
Lighting
The better your lighting the better the entire cage will look and function for your chameleon. We are lucky to have powerful T5 and LED lighting technology available to us. Here is where getting the lighting off the top of the cage becomes very handy. Lights are fragile and having them jockey for position on the top of the cage becomes precarious. For this cage set up I will be taking full advantage of the shelf method and will be using a four bulb T5 fixture with one of those bulb slots being an Arcadia 12% UVB bulb. This fixture is 14″ wide.
With Daylight we need to provide white light to see, UVB light for Vitamin D3 production, and a heat lamp for them to bask in and warm up in the morning.
Both 6500K White light bulbs and UVB bulbs come in the T5 High Output (HO) format so can be used in standard T5 HO fixtures.
When selecting a fluorescent fixture, one aspect to pay close attention to is the reflector. The most efficient design is when each bulb has its own reflector.
The cage is 45″ wide, so I will use 48″ wide fixtures.
There two options presented here and which one you select depends on whether you are resting the light fixtures directly on the top of the cage or if they will be suspended above the cage. In my example I am using a 5′ wide wire shelving unit which allows me to place the top shelf 4-6″ above the cage. Being able to put all the lighting up 6″ is a superior approach as it allows the intense energy coming off of the UVB to dissipate to reasonable levels before entering into the chameleon’s living space. But a second option is provided if you are resting the light fixtures on the top of the cage.
Lighting Option 1: Lighting is suspended above cage
If the lighting fixtures are able to be suspended 6″ above the cage we will use a four bulb T5 fixture filled with 6500K daylight bulbs. This will provide a great amount of light. The UVB bulb can now be in one of the four slots. Each slot in this fixture has its own reflector so the UVB remains quite effective
On this list is
- A 48″ Fixture with 6500K Daylight bulbs already installed
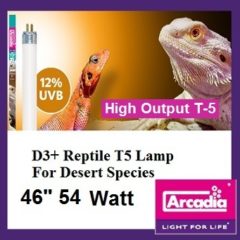
- Arcadia 54W, 46″ 12% UVB bulb.

IMPORTANT NOTE ABOUT UVB: The target UV Index reading for most chameleons commonly kept in captivity is UVI 3. We want this at the back of our chameleon. The only way to guarantee this reading is to purchase a solarmeter 6.5 and take regular readings. The graphic shown here of the basking branch 6″ below the top of the cage and an Arcadia T5 12% UVB bulb 6″ above the cage is a good set-up to get an average of UVI 3. But it will be much more intense at the beginning of the bulb’s life and it will degrade over the lifetime of the bulb. Therefore, the strategy is to provide ample foliage below the basking branch that is will block out most of the UVB light and give the chameleon an escape.
Lighting Option 2: Lighting fixtures rest on cage top
If the light fixture will rest on the cage top we’ll use the quad light fixture. I will replace the one bulb above the basking branch with a UVB bulb. Since the light fixture is resting on the top of the cage and the UVB bulb is much closer to the basking branch I will use the Arcadia 6% T5 UVB bulb. The thing to watch for is your chameleon crawling upside down and exposing its belly to the UVB light. At the cage top, the UVB will be unnaturally high. It will lose energy quickly, but the cage top is essentially at the surface of the UVB bulb and that is an intense place to be! The fixture will come with four 6500K bulbs already. Replace the slot that shines down on the basking branch with your UVB bulb.
Ideally, you would raise the light fixture 2″ off the top of the cage using blocks or anything to lift it from the top of the cage. This gives the strongest of UVB energy a chance to dissipate before getting into the cage with your chameleon.
On this list is
- A 48″ Fixture with 6500K Daylight bulbs
- Arcadia 54W, 46″ 6% UVB bulb
Basking
Creating a warm spot for basking is most easily accomplished by use of an incandescent bulb shining down on one corner of the cage. It is also the most dangerous item in our entire set-up. The basking bulb is our fire risk and we must take extreme caution when setting it up. It is critical to take the following very seriously:
- Verify that the lamp reflector is rated for the wattage bulb you use. This wattage limit will be printed on the reflector. Do NOT exceed this limit.
- Make sure that the basking lamp is firmly anchored on a surface that will not allow it to fall. The basking lamp must be able to take a child bumping into the cage, any other pet activity (such as cat jumping), or natural events such as earthquakes.
Reflector: The clamp lamp suggested here has a dimmer switch integrated. While a dimmer switch is not mandatory it is a useful tool for us to be able to dial in the temperature to what we want. This can be useful as seasonal variations may require less or more heat to be shown into the chameleon cage. Lamps are commonly placed on the top of the cage screen. I will show how to do this, but the final system will have the bulb raised above the cage for a much better heat spot generation. This is what the rack system does for us.
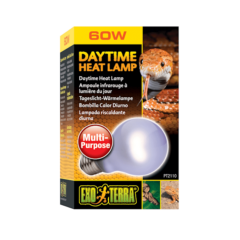
Bulb: Incandescent bulbs are more and more difficult to find as LED technology is much more efficient. But the waste heat is exactly what we want! So we are having to rely more on specialty reptile bulbs.
As with the daylight and UVB fixture, there are two options. The heat bulb has the same characteristic that the temperatures are the bulb surface are blisteringly high and our useful range is further downstream. Raising the bulb six inches above the cage allows for using a larger wattage bulb and having the effective temperature range being in a larger part of the heat cone coming off the bulb.
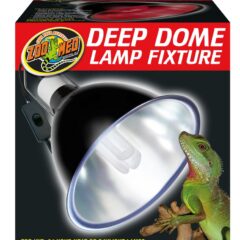
Cage Top Option: For the cage top we want to give space between the bulb and top of the cage. Even with a low wattage bulb this is important if you have a chameleon that is small enough to screen walk. A larger chameleon that cannot climb the screen is not as much of a concern as you can control how far they are from the bulb. ZooMed makes a deep dome fixture that can rest on top of the cage, but still offer distance between the bulb and top of the cage.
Suspended Fixture Option: If you have the basking bulb suspended then you can get the 150W bulb and use a reflector with a dimmer switch for full control using both distance and dimming.
Reflector if lighting is suspended above cage
Misting
The most effective misting systems on the market are from Mist King and Cli-Mist. Both of their mist nozzles fit the included Hydration Mounts which mount on the inside top panel. The Large Atrium comes with three Hydration Mounts which may be mounted anywhere along the inside top panel frame. The placement will depend on your interior design. I have found it effective to have nozzles at both front corners and one double nozzle in the middle front. The Mist King Starter kit comes with one nozzle and 90 degree elbow so you can add another single nozzle with T fitting and double nozzle with T-fitting if you would like to recreate what I setup.
Note: Mist nozzles can be purchased with either a 90 degree elbow fitting on top (where the tubing plugs in) or a “T” fitting. The difference is that you need one 90 degree elbow fitting at the end of each run of misters and the rest of them need to be T fittings. The 90 degree elbow is the end of the line. Just make sure you purchase the right fittings! The links below are for the T fittings.
For both Mist King and Cli-Mist you will be required to provide your own water reservoir. This is often a common plastic utility bucket from Home Depot or Lowes or whatever hoe improvement store is in your area.
Note: you will want to use RO or distilled water with your misting system. I have found many drinking water suppliers have water that will not clog the mist heads. I take my 3 & 5 gallon jugs to the drinking water place and fill them all up.
Recommended System:
1 * Mist King Starter System
1* Single Mist Head Mister with 90 degree elbow fitting
1 * Double Mist Head Mister with T fitting
The Cli-Mist is just as good if the Mist King is not in inventory.
Hydration Strategies
Foggers and drippers combine with a misting system to form a complete hydration strategy.
This ultrasonic humidifier, or “fogger”, can be filled from the top and has a dual tube output which is why I like using this model. You will want a timer dedicated to the fogger so you can have it complement, but not be dependent on the mister timing cycles.
The dripper is your hydration test. By running the dripper during the day you can make sure that the chameleon is hydrated. If the chameleon drinks from the dripper then the other parts of your hydration strategy need to be stepped up. Your goal is for the chameleon to be fully hydrated without using the dripper.
Scheduling: Lighting, Misting, Fogging
In setting up my timers I am replicating the above lighting/hydration cycle.
Midnight: all items are off
1AM: Misting system turns on for 45 seconds to create a moisture layer to help fogger “stick” instead of just bouncing off dry leaves
1AM – 7AM: Fogger runs for a 30 minute on/off schedule until 7AM. The frequency and length will be dialed in as I evaluate the need for more or less humidity during the night.
6:45AM: Mister comes on for 1 minute to throw down a layer of dew for the chameleons to wake up to.
7:00 AM Daylight and UVB bulb comes on
7:30 AM Heat Lamp comes on
10:.30AM Heat Lamp goes off – this off time is dependent on what the ambient temperatures will reach during the day. The colder it is the longer the heat lamp is kept on.
3PM: Optional dripper or hand mister session. Here is where I personally observe their behavior and response to water. Ideally, they ignore it. Otherwise I have to adjust my hydration cycle. This is a constant process and will never be completed.
7PM: All lights go out
8PM: 45 second misting to start the night off moist.
Optional Lighting Accessories
Solarmeter 6.5 UVB Meter: One of the most valuable tools that is in the optional section is the Solarmeter 6.5 for measuring UVB. This is the only way to reliably determine your UV Index level. For years, the older model the Solarmeter 6.2 was used, but hold out for the 6.5. The 6.5 measures the exact frequencies that chameleons use to convert into vitamin D3 while the 6.2 is a much wider range and measures into ranges that are not helpful.
Plants
You will find that we start off with live plants. There are many advantages to live plants and these are significant enough that we will be including tutorials on keeping plants alive. We will bypass artificial vines and plants all together.
Using the Dragon Ledges included with this cage, plants may be mounted along the sides of the cage. The most effective implementation of this is the double pot method where a 1/2 gallon landscaping pot is zip tied to the branch support structure and then an identical 1/2 gallon landscaping pot with the plant in it is slid in the mounted pot. This allows easy mounting of the pot and easy removal of the plant in case it needs to be refreshed or replaced. To use the strategy, buy two pots for each plant. 1/2 gallon pots are the most versatile, but smaller pots may be used for accent plants. When using the grid support structure described when we start putting the cages together, you can support up to three 1/2 gallon pots along the side of the cage with Dragon Ledges.
Miscellaneous & Building Tools & Household Supplies
Every home will have a different level of tools. To be thorough I will list below everything you will need to complete this project. You probably have much of this already! But, at the very least, this will let you know what you have to dig through the drawers to find! But for the new chameleon owner that has just moved into their first apartment after college and is starting from scratch – here is your comprehensive buying list!


