
Advanced Chameleon Cage Setup
Advanced Chameleon Cage Setup: Principles and Elements for an Effective Design
Introduction
This article takes you through basic chameleon cage set-up requirements. I will review the basic principles that should be applied to any enclosure type whether screen, solid side, glass, or free range. We will go over how to carry them out effectively and, in this case, exceptionally.
I will review the caging elements needed and provide a brief overview of products. The important part of this process, though, is not necessarily that you use the same components I am using, but that you absorb how I am using them and what purpose they serve. I will be using the top of the line equipment to achieve the optimal screen cage environment allowed by the products available today. In chameleon caging equipment you truly do get what you pay for so I caution against going into your chameleon cage setup with the idea of getting the cheapest possible items. What you save up front will be paid on the back end in the form of your time, replacement costs, and even vet bills. That said, once you understand the principles of a chameleon cage setup you may transfer them to your particular set of equipment.
The Equipment for a Chameleon Cage Setup
Each of the elements of a chameleon cage could fill a chapter themselves as far as their comparison and selection. In order to get to the important part of this article – chameleon cage setup concepts and philosophy – I will list the products I am using with a brief reason and leave it to the reader to do whatever research is necessary for the products they are considering. In this demonstration I will be using the following products:
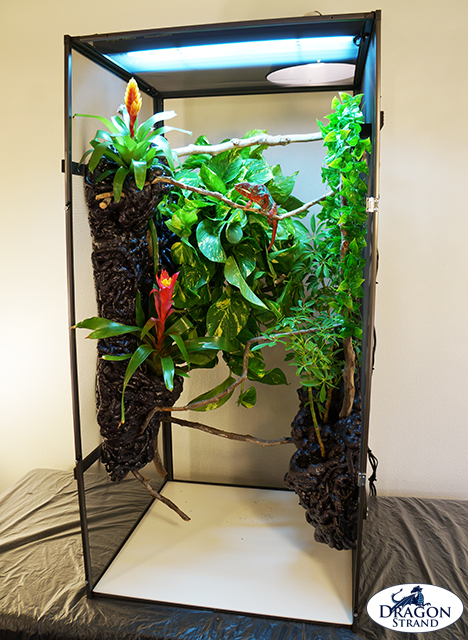
1) Dragon Strand Large Keeper Screen Cage. This 48” screen cage is an appropriate cage size for an adult chameleon and has enough room to create distinct environments. This cage size is commonly found among the different manufacturers. Although Dragon Strand has a higher end chameleon cage in the solid/screen side Breeder Series, I will use the screen cage version as that is the most common cage amongst chameleon keepers.

2) Dragon Strand Large Keeper Drainage Tray. This is a PVC tray that fits under the cage to collect excess misting water. As drainage is a critical part to a successful system ensure your cage manufacturer offers a drainage solution or you must develop one yourself.

3) Dragon Strand Dragon Ledges. These accessories allow us to mount branches and live vining plants to the walls of the screen cage without stress to the screen. These allow a freedom to create much more effective interior environments. Since this is a large cage we will use a five pack to maximize our landscape options.

4) Automated Mist System. A mist system is critical for your chameleon’s health. It ensures that water is available to your chameleon whether you are home or not. I use both Mist King and Cli-mist systems and am very happy with the results. As we are using a screen cage int his example, the nozzles would have to be directed in a way that they do not spray towards the cage walls and moisten the walls or furniture around the cage.
5) Arcadia 24” T-5 Quad Bulb Fixture. T-5 bulbs give off much light in a small package. The quad bulb package has UVB, Daylight, and Plant light bulbs. Your lighting solution must provide both full spectrum daylight as well as UVB light. I have a dedicated appliance timer driving the fluorescent fixture.

6) Heat Lamp. I am using a standard reflector and incandescent light bulb from my local home improvement store. While there are brand name reflector and heat producing bulbs available, the benefits are not substantial enough to warrant mentioning. I have a dedicated appliance timer driving the heat lamp.
7) Great Stuff Pond & Stone Foam. An expanding and hardening foam which will be used to create a naturalistic type environment. This is not necessary, but I consider the aesthetics of a chameleon cage as vital as the functionality.

Basic Concepts and Principles to Chameleon Cage Setup.
There are two key elements to keep in mind when setting up a chameleon cage. Gradients and Levels.
Gradients. A gradient is a gradual progression from one extreme to another. The gradients a chameleon requires are heat, UVB, humidity, and exposure. Gradients are critical for the chameleon to take care of its own needs within the relatively small confines of a cage. It is our responsibility to create the highs and lows necessary for the chameleon to live comfortably in that small space. Chameleons actually adjust quite well to a cage space if their needs are met. In fact, you will know when your chameleon’s needs, whether physical or psychological, are not being met when they start climbing the walls and ceiling and are trying to find a new area to sit or hunt.
Heat: A heat gradient would be the progression from the hottest point under the heat lamp to room temperature somewhere else in the cage. We will specifically place our branches and climbing surfaces so the chameleon can comfortably choose any point along that gradient depending on how much heat they desire.
UVB: Know the effective range of your UVB bulb. Usually it is 12 inches from the bulb. If the chameleon does not have a convenient branch within 12 inches then you are running the risk of the chameleon not getting enough UVB even though you have fresh UVB bulbs. Plan for a UVB basking area. It can overlap with the heat basking bulb, but I suggest not making that the only place the chameleon can get the UVB. Once again, choices are key to the chameleon regulating their own needs.
Humidity: In practice, humidity is more of a pocket rather than a progression. It is especially challenging in a screen cage because of all the ventilation.
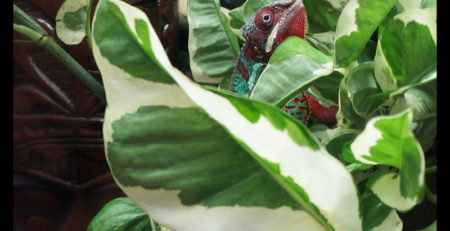
Exposure: Heat, UVB, and humidity are pretty easy to understand. Let’s step back and take a look at the exposure gradient. Exposure is how viewable the chameleon is. It is common for this to be overlooked in cage design because we are only thinking about how we want to see our chameleon. Thus, the standard cage design today does not incorporate a place for the chameleon to get away from it all. They are constantly on display. But they, like us, also have a psychological need to be able to choose how public they are. Regulating exposure is challenging in an all screen cage where the chameleon is suspended in space with a 360 degree view. I am going to use live vining plants to accomplish this in my design. And, you’ll see how the foam will make this even more effective.
In practice you’ll find that even typical extroverts such as Veiled and Panther Chameleons will use these hidden areas at times throughout the day. Quadricornis, montium, deremensis and shyer species will spend most of their time in these protected areas. Jacksonii tend to fall somewhere in the middle. But regardless of the species, your chameleon will have it’s own personality and you want to give it the feeling of security no matter its personal level of gregariousness.
Levels. The second consideration is levels. Chameleons are horizontally perching animals. While you will find them at many orientations, they generally seem most comfortable horizontal. So we will want to create horizontal levels to their home that are connected with vertical and diagonal branches. I suggest creating at least two main levels and, even better, three. With this cage we will make an upper level which will offer the perching area for the highest heat, UVB, and exposure with the lowest humidity. The lower level towards the bottom of the cage will have the lowest heat and UVB. Both humidity and exposure are created by pockets of something instead of distance away from a certain point. So I will use the space in the middle portion of the cage to create a glen, or retreat, of sorts at the middle level. This is an area where I can take advantage of the plant cover to increase humidity and give some psychological cover.
Chameleon Cage Setup Step 1: Arranging the Outer Elements
The first thing you want to do when setting up a cage is to make a plan for how it will look. I usually put together a sketch to give me a guideline. You want to plan for the following:
Where does the heat lamp go?
What kind of watering system will I use and where does it go?
How do I handle overspray and drainage?
Where does the daylight/UVB lighting go?
In my plan I am putting the heat lamp in the back right corner and the daylight/UVB along the front. I do this so that my chameleon will be front-lit giving me a nice view. Chameleons lit from the back become silhouettes. Since this is a screen cage and I need to take mist overspray into account, I am going to install two nozzles in the front two corners and point them at the plant groupings once the plants are installed. This will keep most, if not all, of the spray inside the cage. Now that we have the outside figured out, lets go to the inside.
Chameleon Cage Setup Step 2: Arranging the Interior Main Elements
To start off with, we install our major cage interior elements. These can be plants, feeding stations, nest boxes, or any other element appropriate to the species you are designing for. Then we can create the climbing infrastructure around them. In this case, I have plants as major elements of my design so I am going to install my plants in the locations I have determined. I am specifically keeping the floor clear of any potted plant so that I can pull the floor in and out for easy cleaning.
Note: Do not plan on the screen wall as a suitable climbing or perching surface. Screen has a certain diameter hole and is great for only a certain size chameleon. Most adult chameleons will not be comfortable climbing a screen wall. You’ll want to provide enough branch structure that the chameleon will be able to reach anywhere they wish using branches. I recommend various diameter branches to provide a variety for the chameleon’s feet to grasp.
In this example, branching will be done using zip ties and hot glue. Zip ties are good for structural strength while hot glue holds items in place. If the branch holes of the Dragon Ledges are used, hot glue can be used to ensure that the branch stays in place and the load stays on the Ledges. Artificial vines can be used to hide the zip ties if desired.


Chameleon Cage Setup Step 3: Branching to Create the Different Levels
Branching the Upper Level
So now that our major interior elements are installed, let’s get to the branching. First, the upper level basking area. The majority of the species of chameleon or other reptiles/amphibians will appreciate a chance to warm up in the morning. Some are sun lovers and some hide in the shadow, but the important thing is to give them a choice. That choice should not be a 100% on or 100% off so you’ll want to provide a basking branch that leads away from the basking bulb. The chameleon can regulate their own temperature by the distance they sit from the bulb.
In this cage, I have planned for the heat lamp to be in the back right corner – opposite my live plant.
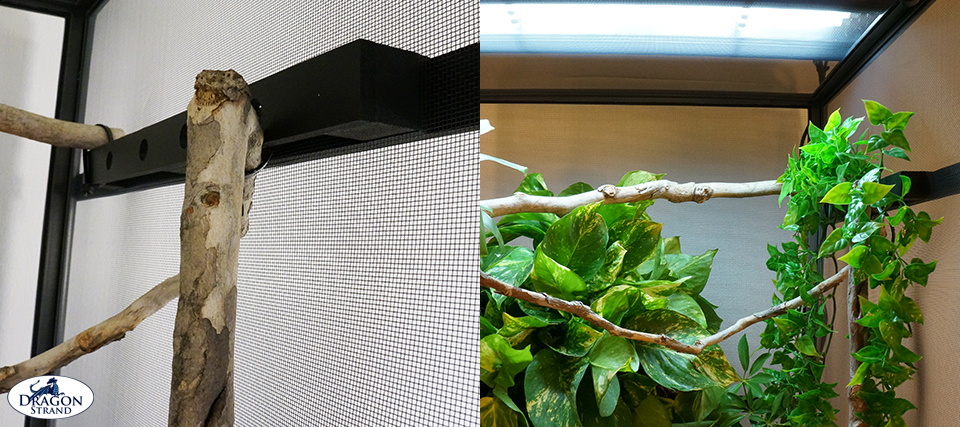
When you are using the Dragon Ledges you can easily anchor the branches either by zip ties or hot glue. I am going to be using zip ties and I’ll use artificial vines to hide the ties that my foam does not.
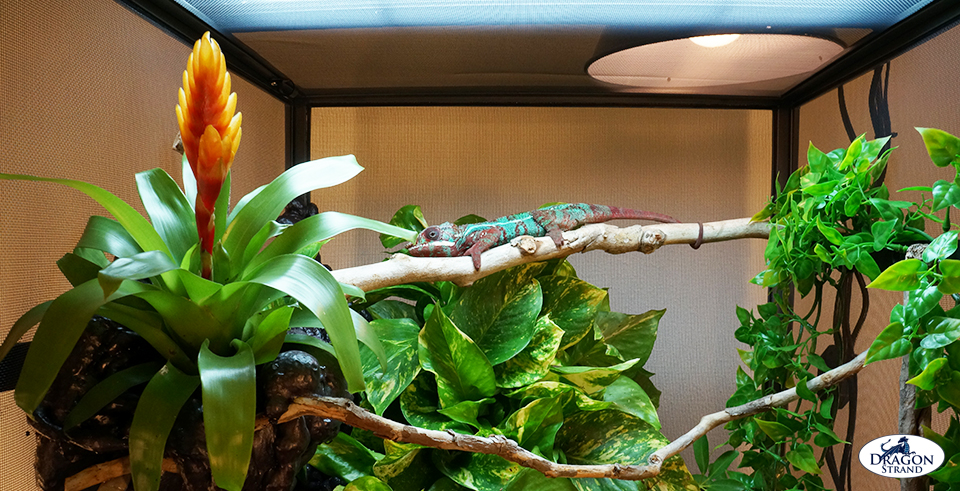
In this design I have a horizontal branch across the top. Although this is a heat gradient branch, running it under the UVB bulb also allows maximum UVB exposure at any point along that heat gradient. This same principle is applicable in any size cage as shown below in the 36″ cage with a typical photogenic Carpet Chameleon.

Branching the Lower Level
For the lower level I use horizontal branches and diagonals. This layer offers varying degrees of cover, but its main purpose is to give your chameleon access to all areas of the cage. Gravid females especially will appreciate easy access to the bottom of the cage. Regardless of gender, there should always be a way for the chameleon to easily find its way back into the branches if, for whatever reason, it finds itself at the bottom of the cage. Keeping the bottom of the cage clear removes hiding spaces for feeder insects and allows for easy floor removal and cleaning.
I always have a branch within the chameleon’s reach from the floor. Screen is not an ideal climbing surface for most adult chameleons.

Branching and Planting the Middle Layer
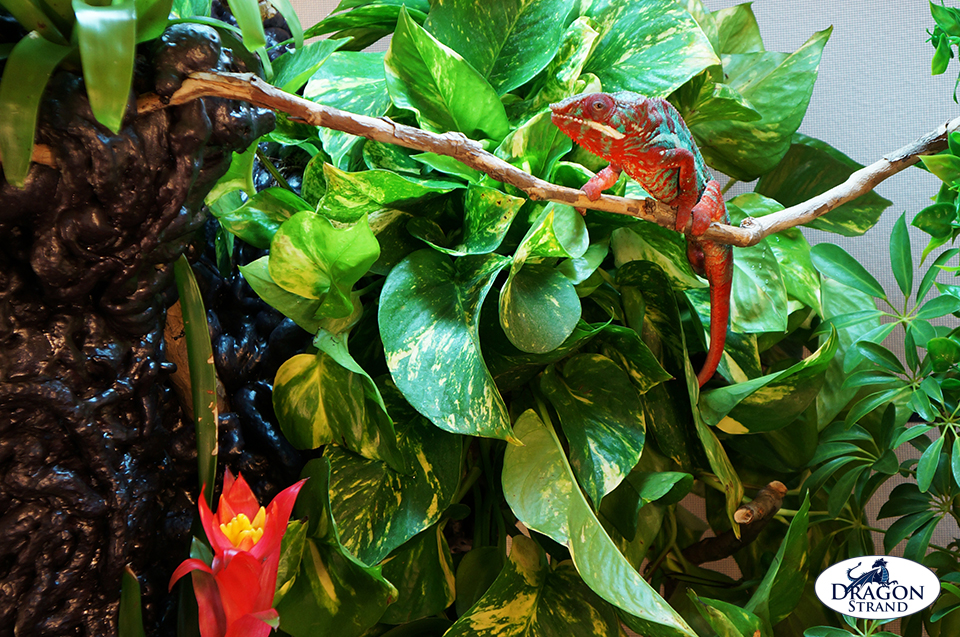
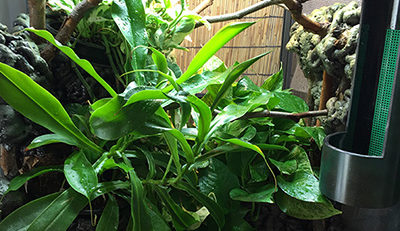
The middle layer would contain most of the plants and should provide cover for the chameleon. Here is where you can best create your exposure gradient. In this cage example I am using a large pothos to provide drinking surfaces, a hidden glen, a humidity pocket, and enormous aesthetic appeal. The vines will actually provide a great deal of climbing surface so, in this level, I mainly have to provide a perching branch hidden behind the vines.

Mounting a Live Potted Plant in a Screen Cage
Live plants are the centerpiece to any chameleon cage that desires to look natural. Live plants give attractive drinking surfaces and can be used to create humidity pockets and hidden glens. The problem, in the past, has been the weight of the pot and dirt. Here is where the Dragon Ledges come into play. The Dragon Ledges from Dragon Strand are structural elements which allow weight to be borne by the frame instead of the screen. They have been tested by hanging bricks in a screen cage so you know they will handle a substantial potted plant. They are a retrofit kit for existing screen cages. We will be using these Dragon Ledges to mount a live vining plant on the wall. This gives the chameleon drinking surfaces at any level you choose and allows hiding spaces to be created. For a typical design with Pothos (AKA Devil’s Ivy), you will want to place the plant around the three quarters height of the cage. This gives an area above the plant for a basking layer as well as space for the plant to have head room space to grow naturally. It also allows an area below the plant to create a visual hiding spot.
Once we determine the spot for our plant we must anchor it in. One trick to installing a potted plant is to get two identical pots. One you will use for all the mounting and strapping in and the other will hold the plant. This makes it very easy to plop the potted plant in when ready. Alternatively, you can just shovel the dirt and plant in when you are finished.
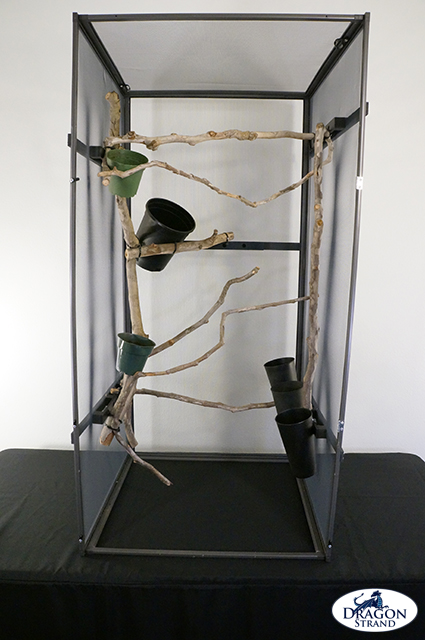
When mounting the pots, remember the rule of threes. Give three points of anchor. When the plants and dirt go in there will be much more weight. With only one or two anchor points the weight of the dirt will cause pivoting and the weight may rest, at least in part, on the screen. This we want to avoid. Large sticks lashed to the Dragon Ledges are a convenient way to provide other anchor points in mid-air with the same strength as the Dragon Ledges. I use a combination of zip ties, galvanized steel wire, and hot glue to get the pot in place and facing the correct way. I suggest angling your trailing vine forward to get a better effect from the vines and produce the makings of a pocket for the retreat. Other smaller plants can further enclose the retreat area and increase the overall aesthetic appeal. In this cage design I will be using the Great Stuff foam so I do not have to be as careful how my mounting hardware looks as it will be covered. The foam will harden and hold everything in place.

If you are not using foam you just have to be a little neater, but, as you can see in this example done in a smaller 36″ tall cage, this is not a problem. Once the plant is in place, the black zip ties and Dragon Ledges fade into the background and are not distracting.

Hydration and Drainage
There are two uses for water which you much provide. The first is drinking. Placement of plants with respect to the watering system is not an accident. You need water dripping down on the plant leaves and these leaves nearby convenient perching branches. Once the entire cage is together you may have to adjust some placements to ensure maximum use of the water coming down.
The second use of water is hygiene. Chameleons need a good rain to keep their eyes clean. This is the reason why drippers are not a full solution. If you are using a dripper to provide drinking water you will have to consider a weekly drench in the shower to allow body cleaning.
In this example, I am using an automated misting system. Droppers will allow the chameleon to drink, but will not give the chameleon the ability to clean out its eyes. “Misting” will cover both drinking and hygiene purposes.
The water that goes in the cage will come out of the cage. You need to plan on where it will end up. Unless you have another drainage tactic planned out, get yourself a drainage tray. It is designed to solve the drainage problem in a simple manner and can be used anywhere in the house. If you have not yet purchased your cage, I strongly suggest you verify that your manufacturer has a drainage tray available or else you will be stuck. Most cages come with a PVC floor that makes cleaning easy, but it also holds some water before it flows into the drainage tray. To avoid the pooling of water, drill numerous small holes in the PVC floor and you’ll facilitate quick drainage. The water will quickly drain into the tray and you can remove it using a turkey baster or wet/dry vacuum. In dry climates you can just let evaporation take over.
Chameleon Cage Setup: Adding in a Naturalistic Feel
“Great Stuff” is a brand name of a widely available foam which is used in the home improvement sector to fill gaps in walls and such. You stick the nozzle in a hole and the foam shoots out and expands to fill the gap. There are many versions of Great Stuff and they are creamy white except for the Pond and Stone version. This version is twice as much money, but it is black and fish safe. That is worth it! If you use the standard version of Great Stuff it will look artificial unless you slather it with black silicone and moss. Your money savings just went out the window with that. It would be a good idea for you to get yourself a can of Great Stuff to do a practice run and see how it comes out. This really is something where personal experience means a great deal in making sure your first try is successful.
Use disposable gloves and old clothes when working with Great Stuff. Learn from the mistakes of your predecessors! It will stick to skin and clothes and good luck getting it out. There are solvents you can find, but it is easier to just not get yourself in that position to begin with! Suit up from the beginning. Also note that once you start a can you will not be able to use the remainder of the can because the nozzles will clog up after first use.
Great Stuff expands. This means that you can lay down a thin layer of Great Stuff, but the next day it will be a thick layer. Apply quickly and confidently. The critical key in all of this is to make sure you get foam in and around the Dragon Ledges. This is what makes this all work! Foam directly on screen will seep through in some places, but mostly will expand away from the screen. This means that the foam can be peeled away from the screen. Not good. And we don’t want the screen to be bearing the load anyways. But with the Dragon Ledges embedded in the foam you have firmly anchored the entire foam structure to the frame. It will go nowhere!
If you are foaming around mounting pots with a large amount of foam then consider strengthening the pot from the inside as the foam will place pressure on the pot. Expanding foam may misshapen the pot making it difficult to slide your plant pot in. If this happens you will have to just plant the plant directly in the mounted pot.

Another planting option with foam is to carve your planter directly out of the foam. This can be done for small accent plants. Although the surface of the Great Stuff will start to harden pretty quickly, give your Great Stuff mound a couple days to set before carving out structures. Once it is ready, get yourself a knife and carve out a hole. Make a drainage hole, place soil inside, insert plant, and you are set!
Drainage for pots
If you are covering the bottoms of your pots with foam you will have to provide a method for drainage. You will have to decide on drainage for your pots. I have used two methods with success. The first is imbedding a length of ¼” tubing and letting that be my drainage, or else I drill a hole through the pot and foam and let the water trickle out. Don’t worry about the foam. Water will not damage this Great Stuff. It is designed for fixing ponds, after all.
The End Result
Maintenance
Your cage is done and your chameleon is happy! What now? Your regular maintenance will be keeping plants watered and trimmed. In a Breeder series cage you can mist the entire cage and the plants will get watered every day, but in the more controlled environment of a screen cage you will have to supplement your plant watering on a regular basis. Other than that, periodic trimming will ensure your plants do not become too big for the cage. You may want to include plants other than pothos. Spider plants or Schefflera are other good candidates. Explore different plants. You will find some plants do great and others get stringy due to not enough light. This is just part of finding the right combination. Take the plant out and replace with another type until you find the ones that work. If you use the dual pot method I described before this is an easy process.
Conclusion
In this article we created a very effective cage to house a chameleon. The steps presented can be used with any enclosure scheme. Just apply the basics to your chosen equipment and remember these two guiding principles.
1) Gradients: Heat, UVB, Humidity, and Exposure
2) Levels: Horizontal perching levels connected with diagonal and vertical climbing elements.
Consider approaching the cage from the perspective of creating a beautiful environment where the chameleon is just one element. The cage should not only be functional for the chameleon with water, food, and each one of the four golden gradients. The cage should also be a work of beauty which you enjoy whether or not the chameleon is in view.
Enjoy, and take seriously, the privilege of sharing your life with these wonderful mini tree dragons!


Comments (10)
Did you spray the Great Stuff directly onto the screen? Looks Great!
Brenda,
Yes, you can spray the Great Stuff directly on the screen. Just be sure, if you are using the Great Stuff to hold in pots, to have a solid anchor like the Dragon Ledges to bear the weight. The screen can hold a little bit of weight, but the best design will have the screen be non weight bearing. So if it is just a little bit and decorative you don’t have to worry too much about anchors.
Bill
Can you explain how you are able to clean the Great Stuff? Do you take it out when you clean it with the mounts?
The Great Stuff mounds stay where they are. During a cleaning I will gently rub the cleaning agents on the mound with a very small brush. Chlorohexadine is a good cleaner. Although a Great Stuff mound would be very difficult to disinfect so I suggest doing a simple quarantine cage until the chameleon is clean and then move him/her into a naturally done up cage.
In a breeder cage setup with the breederbox underneath, would you put a drainage tray under that? Is the lay box already drilled?
Rachel,
You could put a drainage tray under the Laying box. We do not pre-drill holes as the drainage solution is left up to the keeper. I have done it with and without drainage. When I am using it as a bio-active type floor I will put the laying box on a 25″ Heavy Duty Drainage tray with holes drilled in the bottom of the laying box and active drainage. This way I can have as much water going into the system as I feel my chameleon needs. When I use it as a communal laying box it sits with a plant and just enough water to keep the plant healthy. Drainage is not needed if I am careful how much I water. When a female is ready to lay eggs I just pick her cage up and put it over the laying box. This way the female is in familiar surroundings and just suddenly has a dirt floor that she can lay eggs in! When she is done laying I take her cage off and put it back where it spends the year. That frees up my egg laying box for any other female that needs it.
In this 24×48 set up are you using two or four large vertical branches? I know you used 4 in the medium Atrium set up.
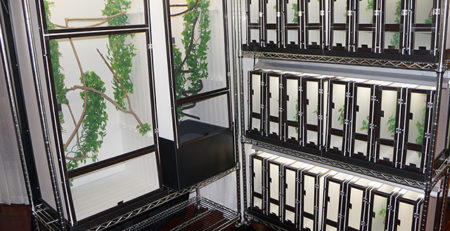
Is the back of the cage in the very last picture covered with cork bark?
Thank you!
Robin
In this build I did not use four large vertical branches like I did in the Medium Atrium set-up. But, the Medium Atrium set-up is the way I prefer now. Using two “pillars” per side give me a great deal of flexibility to mount those horizontal branches and pots at any level. In this particular build, I relied on the Great Stuff foam to provide structure. This works beautifully! But to do this without the foam I need to rely on the vertical branches for the structure.
The cage in the last photo was made using the Medium Breeder Cage so it had PVC sides. This made it easy to silicone on cork bark.
I will use the 4 large vertical branches. I have ordered the 24x24x48 clear side so I assume I can silicone cork bark on the back clear panel?
Thank you.
The Clearside material is a durable flexible PVC material which is pulled taut much like the screen is. This give the humidity holding and visual benefits of glasswork without the weight. One nature of tis material is that it has give and take so it isn’t the best material to use as an anchor.The Dragon Ledges were specifically designed to be a structural element and so you would want to use a network of sticks anchored on the Dragon Ledges to provide the support for anything on the sides. The clear side are like the screen sides in that they should not be weight bearing.
The cage that I siliconed cork bark to was part of the Breeder series so it had two white PVC walls which can be load bearing and will not flex.
Comments are closed.