
Build Guide: Tall Hybrid Cage
Introduction
This tutorial shows how to set-up the Tall Hybrid Cage System in the floating garden style to create an effective environment for a chameleon.
In this build we will execute the Forest Edge 4+4 method. The “Forest Edge 4+4” method is a checklist type guide to ensure we have all the necessary aspects to a chameleon specific environment. If you are building this cage out for any other type of arboreal reptile or amphibian then tweaks to the specific implementation may need to be tweaked for your species. But the overall creation of an arboreal living environment should be very similar.
The Tall Hybrid Cage measures 23.75″ wide x 23″ deep x 48″ high and is offered as a system which gives us a number of tools to make our job much easier. These tools include solid back & side walls, six Dragon Ledges, a fitted drainage tray, and two Hydration Mounts that allow us to install both a mist head and a plant watering drip system. This cage is designed specifically to create a living and healthy floating garden style cage interior. The defining characteristic of the floating garden approach is that it leaves the floor clear. Not only does this give a beautiful presentation, but keeping the floor clear gives you a way of easily measuring your reptile’s health via frequency and composition of the poop. This is a very valuable tool in the husbandry of species that spend much of their time living in the leaves and actively hiding any sign of illness. And, of course, cleaning is very easy.
If have not yet purchased a Tall Hybrid Cage you may do so when you are ready below.
Step 1: Assemble Cage

Assembly
If you haven’t already, follow the assembly instructions to assembly the cage. Click the icon to access the assembly instructions. Basic reminders for success are 1) use a bowl to hold all the screws you take out of bags, 2) Build the cage on a flat surface, 3) Don’t overtighten the screws.
When we build out this cage we will be moving a lot of things in and out. It will be much easier to build out this cage without the door attached so I suggest to not install the main door just yet. That will be the final step in the entire process. The service door is fine to install and helps the stability of the cage as we move things in and out and cinch things tight with zip ties.
And just one note on using zip ties. Zip ties are very strong and will force two objects together. Use zip ties to hold two objects in place (example: a branch resting on a Dragon Ledge.) Do not use zip ties to pull two objects across an empty space. An example of this would be a large branch that is an inch away from the Dragon Ledge. If you zip tie objects together that are not already resting against each other, one or both of the objects can break or deform. The walls and Dragon Ledges are strong and will hold up against excessive zip tying, but the door may no longer close smoothly if the sides have shifted. The lesson is that zip ties should be used to keep the cage items in place, not to force the objects into a certain configuration that they resist.

It should be no problem for one person to assemble a Dragon Strand cage. But it is always fun to have friends help you. You never know when you might lose a certain piece of ripped off cardboard and a true friend will make sure you do not lose such a treasure.
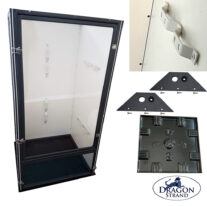
Hydration Mount

When considering the placement for the mist nozzle we need to consider what we want it to do. In my designs I am not using the misting system to shower my chameleons. Although it has been, up until very recently, something I practiced, I am now listening to my chameleons when they tell me they don’t like to be sprayed. So my misting system is now used to help with night time humidity and lay down a layer of dew for the chameleon to wake up to in the morning. This means I need my mist nozzle in the position where it can reach the leafy areas. There are two Hydration Mounts that come with the Tall Hybrid Cage System. With the solid back and side panels we have great freedom as to how we point the nozzles because we don’t have to worry about spraying the house walls behind the back panel. Take advantage of this and create a heavily planted cage with plants that will thrive in the mist and humidity! It is no coincidence that a healthy thriving plant filled environment makes for healthier chameleons.
The Dragon Strand Hydration Mounts can be attached anywhere along the inside frame of the top panel. In the Tall Hybrid Cage the best candidate areas are anywhere along the sides by the front. This gives a wide coverage over the entire cage area. I have dense leafy areas on both sides so want the mist coverage. My object here is surface coverage as I want my chameleon to wake up to a world covered in dew. Be careful to remember that a heavily coated plant in dew does not mean it is getting water to its roots. Check and make other watering arrangements if need be.
You will notice that the Hydration Mount has two holes. One is the standard Mist King/Cli-Mist misting head hole that we just discussed, but there is a smaller one as well. This one is grommeted and is designed to allow you to input 1/4″ tubing into the cage. This can be used for plant drip systems or an entry point for the Exo-Terra Monsoon mist head which has a suction cup. Warning! To use the 1/4″ entry point now, or ever again in the future, you will need to remove the grommet and then install it back from the top above the screen. The grommet’s purpose is 1) to provide a snug fit for the 1/4″ tubing and 2) hold down the loose screen strands produced by poking a hole in the screen. Remove the grommet before installing the Hydration Mount! Put it somewhere safe if you are not going to be using it immediately. If you decide to install the grommet now to make sure you do not lose it just remember that there will be a hole that flies can escape from if you do not put a drip system in. This is easy to temporarily plug, but just remember to do it! The whole issue here is that the grommet is designed to be tight fitting and it is very difficult to squeeze the grommet together and push it through the hole when the grommet is pressed up against the screen panel and held in place by three screws.
Save installing the mist head and 1/4″ tubing input until after the cage is assembled. The Hydration Mount goes in before the cage is assembled only because of the difficulty in driving screws into an aluminum frame when the cage is assembled. It can be done, but the level of frustration in doing it, along with the chances of slipping and making a hole in the screen top, is high. But the mist head and 1/4″ tubing installation can be done easily at any time in the future.

The Hydration Mount from Dragon Strand was designed to give us the freedom to mount our mist heads anywhere along the inside frame.

IMPORTANT: Before mounting onto the panel, remove the 1/4″ tubing grommet! This input allows 1/4″ drip system tubing to enter the cage for a plant watering system as well as allowing in the Exo-Terra Monsoon mist nozzles. The main Mist mount hole fits the standard mist heads from Mist King and Cli-Mist. I will be using the grommeted hole to install a drip system.

When ready to install the mist heads, find the larger hole for Mist King and Cli-Mist and save the smaller hole for future 1/4″ plant drip systems (or use it for the Exo-Terra Monsoon input)
Stand and Placement
Placement
Somewhere along the way you will have to think about where you will be placing the chameleon cage and what you will be setting it on. Ideally, you figure that out in the beginning! The reason is that you can use elements of your home in your cage set-up. Chameleons have excellent vision and they can see everything in your house. The placement of your cage should take into account the flow of human and other pet activities as well as where the windows and heating/cooling vents are. The Hybrid cages have the advantage that they are visually isolated on most sides. Not only can your cage occupant not see and be disturbed by the activity going on to the sides and back of the cage, he will actually feel more secure because he cannot be attacked from those sides. This is life for a chameleon and is not necessarily a stress inducing arrangement, but our goal is to create a hidden area for rest and relaxation. We may as well make sure it is as effective as possible. The opaque back and side panels make the most of the cage safe and you can take advantage of this in creating your chameleon safe places.
Stand
I use standard baker’s wire racks for my cage stands. For individual cages, the 48″ wide racks work fine. The standard ones are only 18″ deep so there is some overhang of the drainage tray. In my particular case, I will be setting up two cages next to each other so I will use a 5′ wide x 2′ deep shelving unit. These wire shelves have great flexibility in that the shelves can be set at any level and it is all on wheels. I can have storage below the cage and my lights and equipment set up on a shelf above the cage. This allows me to have my energy sources raised above the cage so my chameleon does not have to deal with the intense energy produced in the first couple inches of the device. I will go deeply into this when we talk about lighting this cage.
Wire Accessory Basket for Fogger
Wire rack shelves also have a number of accessories that are useful us. In this case, a wire basket hooks on the side and makes for a perfect perch for a fogger and a lush potted plant to hide the equipment!

This wire shelving system has been incredibly versatile and will adjust to just about any cage I am building. This one is wide enough for two cages side by side. I am able to easily add a number of accessory baskets which will hold my fogger, but also hold some plants to break up the utilitarian nature of the rack and give it a homey feel. Underneath I have storage space which I can place maintenance items as well as the misting system and water basin.
This wire rack is 48″ wide. This width allows you to place other items on the rack. You can always get a 36″ wide rack for one cage, if you choose. If you desire to get two cages like in my demo then a 60″ wire shelving rack is what you are looking for.
The link above is my choice as it is black, has wheels, and is 82″ high instead of the standard 72″ wire rack.

These black wire baskets make a great storage area for the fogger! I have found the best ones at Target and these can be purchased online at the link in the image.
This is the alternative wire rack at 36″ wide.
If you would like two cages next to each other a 60″ x 24″ footprint shelving unit is more expensive, but provides a very nice base for your cages. This is the one that is shown in my demonstration.
Choosing a Floor
The Tall Hybrid Cage comes with two floors for you to choose from.
- There is a white, PVC floor which can be used if you plan on putting potted plants on the floor of the cage.
- Your second option is a screen “Drip Easy” floor panel which gives you maximum drainage, but is not ideal for placing potted plants upon.
Having two floors allows you to keep a spare floor around in the case of deep cleaning which requires the removal of your floor to be scrubbed and disinfected. In this case you may temporarily use the second floor in the cage so you can leisurely wash the main use floor.

Floor Option #1: White, PVC Floor. The PVC floor is used if you plan on putting potted plants on the floor of the cage. The drainage tray is specifically designed to give support in the middle of the floor area and the solid plastic floor will distribute the weight of the potted plant. If you elect to use the white plastic floor then you’ll need to consider the drainage aspect. On the flat floor water will gather until it grows enough to overcome the floor friction that keeps it from flowing and draining over the sides. If you place a potted plant then there will be a slight indentation where water could gather instead of flowing over the side. In all these cases, the drainage issue can be solved by drilling small holes in the floor panel to allow water drainage exactly where it pools. Select a hole size that is smaller than half the size of your feeder insects so you do not get escapees. For my personal use cages I drill a grid of small holes over the entire floor panel and especially target plant pot indentation so water does not have a chance to “marinate” under the pot.

Floor Option #2: Drip Easy Screen Floor. The screen floor is used with the floating garden style where there are no plants on the bottom of the cage. This allows the use of a screen floor that provides maximum drainage and no standing water.
Drainage Tray
The Tall Hybrid Cage System comes with a fitted drainage tray. Drainage trays are important to keepers of chameleons and other arboreal herptiles because we generally provide moisture through fogging and misting systems which means that waste water ends up at the bottom of the cage. We do not want to allow a situation where poop, water, and escaped feeder insects can combine. This creates a very unhygienic situation where the feeder insect picks up a load of bacteria and can deliver it to the chameleon if the chameleon eats it. We avoid this by placing the cage on top of a drainage tray and having the water drip into the tray.
A couple of things to note about the drainage tray.
- The drainage tray is very strong as far as downward force, but it is not designed to lift and carry the cage. Do not use the drainage tray to carry the cage!
- When cleaning the black PVC drainage trays do not leave them to dry in the sun or put them through the dishwasher. The intense heat in both these situations can warp the tray. The drainage tray is designed to be used indoors.
We will go over emptying the drainage tray in four separate ways
- Evaporation.
- Wet/Dry Vacuum.
- Turkey Baster.
- Gravity Drain.
Evaporation. The water in the drainage tray will evaporate. Whether the rate of evaporation matches your water input to the system will depend on how much water you put into your system and the ambient humidity. Evaporation will also be encouraged by the use of the Drip Easy screen floor. In my case, my water input is only slightly more than evaporation so I end up having to remove water every week and a half.
Wet/Dry Vacuum. The most commonly used method for dealing with the collected water is a small wet/dry vacuum with a crevice tool that can be stuck into the drainage tray and simply suck up all the water. The drainage tray is designed so that if the cage is shifted to a rear corner, there is enough room to the side of the cage to stick in a 3/4″ crevice tool nozzle. If you keep the cage floor clear it gets even simpler as you can open the service door and just stick the nozzle under the floor. Then you can suck up all the water from the middle of the tray.
My wet/dry vacuum of choice is the “Bucket Head” from Home Depot which is an attachment that snaps onto the top of a standard 5 gallon bucket. Add to this an appropriately sized nozzle (sometimes called “crevice tool”) and you are set. I have links below for this product, but these items are also available in-store.

“Bucket Head” Wet/Dry Vacuum Attachment. This product is only the attachment. Ensure you also pick up a 5 gallon bucket and a crevice tool attachment. Look for 1-1/4″ attachments.

5 Gallon Bucket. This will be the water reservoir that the Bucket Head attachment goes on top of.

Crevice Tool. This attachment to the hose of the Bucket Head will allow the vacuum to access the drainage tray.

The drainage tray is designed so there is enough space on the side for a crevice tool to fit to remove water. If you desire to use this method, move the cage into one of the rear corners of the drainage tray and the space will be on the other side.

If your floor is clear then it is a simple matter to go through the Service Door and under the floor panel with the crevice tool and suck up the water from the middle of the tray.
Turkey Baster. This is the v ery low tech version of the wet/dry vacuum. But I did successfully use a turkey baster to remove water from my drainage tray for many months. As the evaporation took a great deal of the water and my misting was not excessive I would come in with a turkey baster every now and then and remove the water. This is simple and cheap, but if you have more than one cage I would suggest embracing a method that is less laborious.
Install a Gravity Drain. A gravity drain may be created by installing a 1/4″ connection in the drainage tray and running 1/4″ tubing to a bucket. This is not a configuration offered off the shelf and requires the drilling of a hole in the drainage tray and gluing a connector. So proceed only if you are confident with a small construction project. It really isn’t that complicated, but you are putting a hole into a tray that was designed to be water tight so you don’t want to mess this up!
As this is a separate project I will link to the guide as to how I implemented this.
https://dragonstrand.com/a-simple-gravity-drain-for-dragon-strand-drainage-trays/
Building the Dragon Ledge support structure

The patented Dragon Ledges are anchors that allow us to mount horizontal branches and potted plants anywhere along the inside wall of the cage. This allows us the flexibility to create beautiful floating gardens seemingly in the middle of the cage. Although we certainly can attach branches and items directly to the Dragon Ledges, we create an even more powerful tool if we zip tie two strong vertical branches to the two horizontal Dragon Ledges on each side. This makes a solid grid that we can attach to at any level that the vertical structure branches reach. I will be demonstrating this strategy here.
Branches can be attached using zip ties. Hot glue can be used as well for connecting decorative items or even branch to branch. But I find, with the constant shrinking and expansion of wood, in misting and heat, that hot glue is not as effective as a zip tie. That said, please experiment on your own and do what you feel would be best. There is nothing here that is one time only. The cage is in constant flux and so we can try anything we want and do over anything that does not work out. Below are some items that may come in handy for connecting Dragon Ledges and Branches. You can purchase through these Amazon links or just go to your local home improvement store or art store.
Connection Equipment
I find the 8″ Zip Ties to be the most useful with the range of branch diameters I try to attach to Dragon Ledges and together. Zip Ties are easily found at home improvement stores in the electrical section if you want to pick them up in person. I use black so they do not stand out as much.
It is worth it to get some micro cutters to trim the tails off the Zip Ties for a clean look and to make the zip ties as inconspicuous as possible.
There are a wide range of glue gun qualities. For this application I choose a 100W unit, though you can find them down to 20W. Whatever glue gun you get, pay attention to the size of glue sticks it takes for when it is time to re-order.
Attaching Branches to the Dragon Ledges
With the strong vertical supports we are able to mount potted plants around the inside of the cage walls. Horizontal branches can be added in at any height for support. Support branches can be horizontal or placed so they run in front of the pot and trapping it in place even without the zip ties. Before branching for the chameleon’s use, the cage is set up with strong support branches to ensure the pots are well anchored.
One hint from experience: If you make the distance between the two vertical branches on each side about 3-4″ it makes for a very effective nesting spot for the pots you will be attaching to them.

The first step is to find some strong branches to use as vertical supports. Anything from a diameter of 1/2″ to 3/4″ to even 1″ is a good candidate. I, personally, seek out Oak as a branch type. The many parks and wooded areas around have an excess of oak branches fallen to the ground so I am kept busy sorting through all of the dead branches looking for the ones with the most character.

Once the vertical supports are in, horizontal branches can be zip tied on at any height by lashing to the vertical supports. Before the plants go in you can put in the major perching branches being careful not to block entry to the pots. (I go over pots in the next section).

To give pots support, shorter “cross beams” can be attached across the two vertical supports that makes just enough of a shelf to attach the pot. I have included this image from the screen cage version because it is much easier to see the concept when you can see through the wall!
Adding potted plants
When I put potted plants in my chameleon cages I like to do a double pot method where I mount one pot to the support structure with zip ties and branches and then I put the soil and plant into an identical pot to be slid right in later. This gives me the ability to remove and replace the plant at any time in the future with minimal inconvenience.
The ideal pot size for this is the 1/2 gallon size. These are often found in garden section of home improvement stores. 1/2 gallon landscaping pots are thin and cheap, but do the job. I can find them for about $1 in cost from the home improvement stores around my area.
When you mount a pot you need support in three places so the pot does not swing or shift. I place my pots with branches on three sides. As long as they are at different heights on different sides they are very effective in holding pots in place.
Mount your pots with the idea in mind that you will have to have enough space to drop a potted plant into the pot. Although that sounds simple, it is very easy to mount pots too high and then realize your mistake when you find there is not enough space for the arc of the pot to fit in. When I mount a pot I actually check it for fit with my potted plant before moving deeper into the build.
To mount the pot I put it in the place I desire the plant and then build up the branch support structure around it. A common configuration is to place the pot between two vertical branches and then zip tie a horizontal crossbeam below it for the pot to rest on. If you remember the hint to space the vertical support branches about 3-4″ apart, well here is where it makes sense. You can place a pot up against those two vertical branches and they will provide a good support distance. Then simply attach a cross beam where the bottom of the pot should be and the pot can rest on the horizontal support beam.

I will be using the double pot method where one pot is zip tied to the branches and Dragon Ledges and the plant is in the other pot. This makes it easy to change out plants if necesary

The pot to be mounted will be put in place and the places where I want to drill holes for the zip ties marked by a Sharpie pen. This can be tricky to negotiate the tight spaces, but this is why chameleon keeping isn’t for the faint of heart. Once my pot has the marks I drill with a drill bit that is the diameter of the width of my zip ties. With cheap pots the plastic will be thin so you may need to develop drilling skill so it doesn’t rip the pot.
I am using standard 1/2 gallon landscaping pots which cost around $1 and are easy to drill through.

The pots are then zip tied to the branch support network.
Every potted plant needs to be secured in three different axises. What this means is that there needs to be three point where the pot is tied down to a Dragon Ledge or branch and that these points need to be offset from each other so there is no “hinging” where the potted plant just swivels. This image shows the three anchor points for this particular pot. This is a typical configuration with the crossbar underneath.
Branching
Branches can be categorized into three types.
Structural Branches: Branches that form the support structure around the cage. These are generally thicker and provide a connection place for the other perching branches. Structural branches can be both vertical and horizontal. The most obvious vertical ones are the two per side that were placed on the Dragon Ledges to form the original grid structure. Thinner horizontal structural branches can be used to wedge pots in place to provide one of the anchor points.
Perching Branches: These are the branches that are selected to be of a diameter between where the chameleon can wrap their feet all the way around to where the chameleon can wrap their feet only half way around. These are placed horizontally as this is the comfort orientation of most chameleons. These should be placed at many places and heights in the cage. The two most important places are in a basking area and in an area hidden by leaves. This gives your chameleon a safe sleeping spot and a warm up spot. This doesn’t guarantee they will use them as we expect, but our job is only to give them the basics and let them take it from there.
Network Branches. These fill in all the spaces. These can be thick or thin. We want our chameleon to be able to use as much of the cage as possible. And by filling the cage with network branches we give our chameleon that option. The sides of the screen cage should not be considered walkways. In fact, screen walking is often a warning sign that something isn’t right with your cage.
We have to start with the structural branches. Once the pots are in we can put in the horizontal perching branches to make sure we have the major functions of basking and sleeping taken care of. We then fill in vertical, horizontal, and diagonal branches as “roadways” for the chameleon to travel from place to place in the cage.


This pictures shows all three types of branches. The structural branches are the thick vertical branches that are lashed to the Dragon Ledges and extend their anchoring value. The two main perching branches are here as well. The basking perching branch is the horizontal branch at the top which will provide the chameleon an open area to soak in both the heat and UVB. The sleeping perching branch is behind the wall of pothos leaves that I am holding open. There are a couple of branches that are behind here that can be sleeping branches. I feel we may as well give our chameleons as many choices as we can! But these are all hidden behind a wall of leaves so my chameleon can feel secure. He may or may not use it, but it is critical that it is available to him regardless of how often he needs to use it. All the other branches are network branches and are climbing tools. Also the thick pothos vines are part of the climbing network.
The perching branch needs special attention because it must coordinate with the light placement to give your chameleon perching space in the right distance from the basking and UVB bulbs. A good guideline to follow is to place the perching branch 6″ below the top of the cage. But this branching needs to be under the UVB and basking bulbs. So it wouldn’t hurt to either place your lighting equipment on top the cage and see where the UVB and basking bulbs will shine. Or else, if you don’t have your lights yet, you can make measurements. In this build I will be using the latest Arcadia ProT5 UVB fixture and the Arcadia Jungle Dawn Light Bar. These have the immense advantage of having a small cross section when compared to the multi-bulb T5 fixtures. If you are using the multi-bulb T5 fixtures then some planning ahead of time is a good idea. But be sure to take into account the misting head. The light placement will have to accommodate this barrier. Remember that there does not have to be just one perching branch. You can have a branch under the UVB bulb and a second one that leads to under the basking bulb.
Lighting
Lighting will be the most complicated part of this set up and I will present three options with the pros and cons of each.
But first, let’s review what we need to provide using light.
- Vision. Chameleons are diurnal visual animals so they need a brightly lit cage area. This is actually not as easy to give as it sounds! It is difficult to find lighting systems that will punch through 4′ of area. But we will target a system which gives bright light to the top half of the cage and the rest can be considered hiding areas. The most effective technology we have is either T5 High Output fluorescent lights or the newer LED technologies. I have worked enough with the LED technology to recommend it as my first choice. The one caution is that the lights are very powerful and plants below them may get light that is too bright. I am still using LED light bars only when I have a wire shelf that allows me to lift them 3-4″ above the cage top. But I will also recommend a T5 fixture to give a variety of options.
- Heat. Chameleons are ectothermic (cold-blooded) so they naturally expect cooler nights and look forward to basking in the sun to warm up in the morning. We need to provide them this opportunity without giving them so much that they burn themselves trying to warm up. I am sorry that it is all a balance with sickness on either too little or too much. But this is the challenge we take on when we take responsibility for a living creature. We will use an incandescent light in a reflector. Incandescent lights used to be easy to pick up at any store, but more efficient LED technology has taken over. Unfortunately, it was the waste heat inefficiency that we needed! So we now have to work to find heat producing bulbs. For this build guide I am going to recommend and link to official reptile basking bulbs. But this is only because I can guarantee the links won’t disappear as plant lights or other lights are replaced by LED technology. As long as they produce heat they can be used as a basking bulb. Just make sure it is the correct level and not too much heat as chameleons are notorious for burning themselves.
- UVB. Your chameleon needs exposure to UVB rays just like we do to produce vitamin D3. If they don’t get it they will get Metabolic Bone Disease which is the reptile equivalent to ricketts in humans. This is where we don’t have enough calcium for our bones and we get rubbery, broken, and deformed skeletons. This will kill a chameleon so this is a serious piece of equipment. We will be using T8 and T5 fluorescent bulbs to give us the proper UVB levels inside the cage. We are targeting a basking area that gives between UVI 1 and UVI 3 with a maximum UV Index at the cage top of UVI 6. There is a great deal of science and experimentation behind these numbers. If you would like to learn more about where these numbers came from I encourage you to check out the UVB section at the Chameleon Academy at this link https://chameleonacademy.com/chameleon-cage-set-up-replicating-the-sun/. I am actively involved in researching the implementation of UVB in captive husbandry for chameleons and will keep both the Chameleon Academy and Dragon Strand at the forefront of what we know.
You will see many implementations of UVB within all my set-ups as I refine the easiest to communicate. I will present one option here that is the simplest to execute. You may see other configurations in these pictures. If you are interested in other options or already have lights that you wish to see if they will work then please visit the Chameleon Academy where I have placed all my work. There you will find charts that show how to use different bulbs and different fixtures. (Chameleons and UVB)
For this build I needed to pick one implementation that was the simplest to both obtain and set-up. I will present a configuration that works with only mounting on top of the cage itself as this is how most people do it. I have encouraged my listeners to use wire racks to allow you the freedom of an entire shelf to place things. It also allows you to use more powerful lights and make more gentle gradients. So I will address this configuration as an alternative. If you are planning to do a “rack configuration” like I have or you have a means for suspending your lights 4″-6″ above your cage you can check out the “Rack Alternative” entry here.
Standard Recommendation: If you intend to place the lighting elements directly on top of your cage.
Quad T5 HO 24″ Fixture with 3* 6500K and one Arcadia 12% UVB raised up on the stands
8.5″ reflector with 75W Exo-Terra Heat bulb
Rack Alternative: Use this alternative if you have the wire shelving rack I am using or you have the ability to suspend lights up to 6″ above the cage top. This is the ideal situation because this allows us to create an effective and gentle gradient of both temperature and UVB. In this case, which is the one I am demonstrating, I will be using an Arcadia LED light bar.
34W Arcadia Jungle Dawn 22.5″ LED Light Bar
24W (22.5″) Arcadia ProT5 with 12% UVB
8.5″ reflector with 100W Exo-Terra Heat bulb
UVB Measuring Meters
Although I am giving equipment and distance recommendations, nothing can replace having your own UVB meter. At this time there is no inexpensive alternative to a Solarmeter 6.5 and its rebranded clone, the 6.5R, which is functionally identical. These meters give results in units of UV Index which is the band of wavelengths that are used to create vitamin D3 in the chameleon.
UV Index levels will vary with bulb age, how long the bulb has been on, fixture type and placement of the basking branch. Thus there is a wide range of measurements that can be taken.
A UVB meter is a very critical and useful piece of equipment to ensure that the UVI levels at the basking branch are sufficient for D3 conversion. UVI 3 has been shown effective in Veiled Chameleons and Panther Chameleons. And ,of course, we are working to verify with other species as well.
When selecting a meter, the two shown below are functionally identical and so you may select the one with the cheapest price or quickest shipping. Note that the prices fluctuate and the prices shown are not always the latest. Clicking them will give the most accurate price.
Standard Recommendation
Use these links if you are placing everything directly on the top of your cage. If you are using the wire shelving rack as I am in this example or have the ability to suspend lighting systems 4″-6″ above the cage top then go to the Rack Alternative.
The advantage to this fixture is that each bulb has its own reflector and so power is not lost by adjacent bulbs soaking in the light.

This is a link to The BioDude supplying a 22″ T5 HO 6% UVB bulb from Arcadia.
Use Coupon Code CHAMELEON10 for 10% off your cart at thebiodude.com

My choice for basking bulb reflector is the ZooMed 8″ Deep Dome. This raises the bulb above the top of the cage and lets the initial high heat from the bulb dissipate before it gets into the cage. This particular reflector is rated for bulbs up to 160W.

I have used the 60W strength with success, but you will have to judge the needs for your situation. NOTE: whenever purchasing a heat bulb verify that the reflector you are using is rated for that wattage or higher.
When setting up the fluorescent fixture, replace the 6500K fixture bulb in the slot above your basking branch with the Arcadia 6% UVB bulb. Using the slot closest to the basking bulb combines heat and UVB on the same branch.
If you can suspend the basking bulb even a couple of inches it will do tremendous good. Chameleons are known to climb the top panel and they are surprisingly unresponsive to burning themselves. They seem to just have no concept of being burned by a basking bulb that is too powerful. However you are able to place the bulb and reflector, check the temperature that your chameleon will be exposed to by placing the back of your hand at the level that the chameleon’s back (or casque) will reach. Make sure it is comfortable for your hand to be there. This is where the dimmer switch shines (so to speak). With the dimmer switch you are able to adjust the light output to accommodate whatever mounting and perching branch distance you have. If you have a thermometer you can take readings and set them for the level appropriate for your species.
Rack Alternative Equipment
Use these links if you are using the wire shelving rack as I am in this example or have the ability to suspend lighting systems 4″-6″ above the cage top. The advantage of this method is that both our heat and UVB lamps put out very high levels of energy that dissipate depending on how far away you are. The closer you are to the bulb the greater the energy difference is over 1 inch. The farther away you go the more gentle the change over one inch. With more powerful lamps you get blisteringly high levels in the first few inches, but by time it gets to 8″ or 12″ you have much less difference over the 3″-4″ that we want our chameleon to bask in. With control over the height we have the lights over the cage we can use these powerful bulbs and have the excessively high energy dissipate in the 4″ – 6″ above the cage. Most importantly, we can have control over the maximum level that goes into the cage.
How high the lights are above the basking branch dictates which strength UVB bulb is used. An Arcadia ProT5 fixture 12% UVB will give us a UV Index of 3 around 12-13″ below the bulb going through the screen top. The 12% in a single bulb fixture, like is shown here, is a powerful UVB source and so 12″ away is the minimum distance the basking branch should be placed.
If you have the basking branch closer to the UVB bulb then a 6% UVB is more appropriate.


The Arcadia Jungle Dawn LED Light Bar gives off an impressive amount of light and is what I am using in my latest cage builds in place of quad T5 light fixtures.

This is the newest fixture produced by Arcadia to drive their UVB bulbs. Each fixture comes with your choice of UVB bulb strength. You can choose between the 6% UVB and 12% UVB bulb. I am working with the 12% UVB bulb in this particular build for reasons listed in the detailed explanation. In my pictures I am using the 48″ version because I am driving two cages side by side. This link is for the 24″ version that will drive one Tall Hybrid Cage System.
My choice for basking bulb reflector is an 8.5″ reflector with a dimmer switch. This dimmer will allow you to dial in the bulb strength to a comfortable level at your basking branch. The dimming function is a must-have for any light I use. This particular reflector is rated for bulbs up to 150W.
I have used the 60W strength with success, but you will have to judge the needs for your situation. Since you have a rack shelf and if you use a dimming switch as is in the Fluker’s reflector you can go up to the 150W bulb and adjust the heat actually reaching the chameleon by distance and dimmer switch. Caution: A hybrid cage will hold in heat so be mindful that you do not let the cage overheat even if you adjust the intensity so it does not burn. Heat will build up. NOTE: whenever purchasing a heat bulb verify that the reflector you are using is rated for that wattage or higher.
The use of the LED light bar and single bulb UVB reflector makes it very simple to find space above the cage for each fixture.
The distance from the top of the cage to the shelf is important. To go along with this build guide, have the shelf about 4″ above the cage. My basking branch is 7″ below the top of the cage.
The LED light bar goes towards the front of the cage so we do not silhouette our chameleon.
The UVB fixture is pretty simple. It is a single bulb fixture with an Arcadia T5 HO 12% bulb. As UVB is a very directional light you need to have the basking branch go directly under the bulb. So put the bulb in the position that is closest to being on top of your basking branch. This, of course, takes a little planning and coordination in the build steps.
The heat bulb will simply sit and shine on the back right corner. I have basking branches there and my chameleon can stay as long as he wants! But we will have the same tuning in of the heat that we have no matter what configuration we use. We need to make sure the temperature is at a level where the chameleon won’t burn itself. So, once again, check the temperature that your chameleon will be exposed to by placing the back of your hand at the level that the chameleon’s back (or casque) will reach. With the dimmer switch, adjust the light output to make sure it is comfortable for your hand to be there. Of course, if you have a thermometer you can take readings and set them for the level appropriate for your species.

From the picture it can be seen that the lights are about 4 1/2″ above the cage and that the basking branch comes in around 9″ below the UVB light. Of course, this is going through screen which will filter out a significant percentage of the UVB. All UVI value given in this guide, unless stated otherwise, are measurements taken with the screen panel between the light and meter.

This arrangement will produce about UVI 4 where the back of a basking chameleon is likely to be. You will want to adjust this to accommodate the reptile species of your choice. UVI 3 has been proven to be sufficient for vitamin D3 production for females producing eggs, with no additional dietary D3, for Panther and Veiled Chameleons. If you want to have a UVI closer to 3 then simply place a 2″ spacer to raise your UVB bulb up. This can be a simple piece of wood.

This reading was taken just to give an idea of what kind of UVB gradient this arrangement produces. I took a reading a few inches below the basking branch. This shows that any part of the basking branch is in a UVI range between 4 and 3. That is higher than usual, but I will gauge chameleon behavior and adjust my UVB accordingly.
Top Shelf Light Placement Guideline Summary
Placing the lights is always a strategic exercise. The guidelines to follow are
1) Daylight is placed over the front of the cage so that the light does not create a silhouette of your chameleon. Your chameleon does not care, but you will!
2) Basking Bulb is placed where it cannot accidentally slip and fall if the cage or rack is bumped.
3) Basking Bulb is kept away from anything that could catch fire.
4) Basking Bulb shines on the branch you have set up to be the basking branch.
5) Chameleons have been reported to bask in heat and then seek out the UVB light. So, although I generally put heat and UVB in the same place, having the lamps next to each other works. Some breeders have heat and UVB at opposite ends of the cage. So, you know,…party on, dudes.
6) Be mindful of where the mister is pointing. You do not want the mister to spray light bulbs.
Scheduling: Lighting, Heating, Misting

When we get into the timing of lights we need to bring in the hydration cycle as the environmental conditions are all tied together.
Appliance timers are used to switch lights and equipment on and off to replicate the chameleon’s natural weather cycles. The above graph illustrates the entire cycle we wish to create. Let’s start at midnight.
Midnight: all equipment is off. No lights or heat is needed at night.
1AM: Misting system turns on for 45 seconds to create a moisture layer to help fogger “stick” instead of just bouncing off dry leaves
1AM – 7AM: Fogger runs for a 30 minute on/off schedule until 7AM. The frequency and length will be dialed in as I evaluate the need for more or less humidity during the night.
6:45AM: Mister comes on for 1 minute to throw down a layer of dew for the chameleons to wake up to.
7:00 AM Daylight and UVB bulb comes on
7:30 AM Heat Lamp comes on
10:.30AM Heat Lamp goes off – this off time is dependent on what the ambient temperatures will reach during the day. The colder it is the longer the heat lamp is kept on. You want to use your chameleon’s basking behavior to guide how long you leave the basking light on. Just to be clear, leave the basking lamp on as long as your chameleon wants to use it! The graphic shows the end of the basking lamp only to indicate that you do not have to have it on all day. But there is nothing wrong with having it on all day if it is useful.
3PM: Optional dripper or hand mister session. Here is where I personally observe their behavior and response to water. Ideally, they ignore it. Otherwise I have to adjust my hydration cycle. This is a constant process and will never be completed.
7PM: All lights go out
8PM: 45 second misting to start the night off moist.
Misting System

If you are using the wire shelving rack you have just enough room to place the misting system water reservoir in the shelf under the cage. The pump will have no problem driving the mist nozzles from the lower shelf.
I have purchased extra corners for the tubing which makes corners much easier.
Hints for misting systems:
- PRESS fit. Put some force behind shoving the tubing into the connectors. If you have any leaks around the connectors, 99% of the time it is just a loose fit. Shove it in harder!
- If the misting system turns on, but the water does not come out you may need to “burp” the system. Simply disconnect the output and run the pump. Once water comes out the output of the pump reconnect the tubing. This is a magic trick that works most of the time.
Note that in all these pictures the lights are on. This is so we can see. In actual use, I do not run the mister during the day. Chameleons do not like to get wet. So I use the mister during the night to lay down a layer of dew and to help the fogger raise the humidity. A cage with wet surfaces is much more receptive to fog rolling in. With out then, fog tends to just rollin and roll out. And, of course, a good spray before the lights come on ensures that the chameleons wake up to dew on the leaves.

Mister purchasing information

Optional: 1/4″ Misting Tubing Corners
Optional, but I love being able to make a true 90 degree turn with my tubing runs! One pack of ten will more than take care of one cage. I usually use four.
- input to pump from water jug beneath
- output from pump to point up the side of the cage
- jogging over the top of the rack
- rack down to mist head.
Fogger
The fogger provides the high night time humidity that chameleons need to maintain a natural humidity cycle. A fogger is most effectively used in the dark morning hours before the sun comes up (or lights come on).
Using the rack system makes for easy placement of the foggers. I have elected to use one of the wire baskets, though it could have easily been placed ion the top of the rack. The output tubes are long and so there is great flexibility in where this has to go.
Hints for fogging:
- Avoid horizontal runs of the output tubing. Keep them at a downward angle or else water will build up in the tubes and the fog will be hindered.
- Put the fogging system on an external timer because the internal timer is a cheap cyclic timer and this does not give us the flexibility we need.
Note that in all these pictures the lights are on. This is so we can see. In actual use, I do not run the fogger during the day. Although I admit to enjoying seeing the fog bank when the morning lights come on slowly dissipate. But the fogger and the basking lamp are not on at the same time. Our recipe for success is cool/moist and warm/dry.

The fogger output tubes are aimed so that the intended sleeping area of the chameleon (the right leafy area) experiences a fog bank just after midnight.

The wire rack shelf and accessory basket provide a convenient place for the foggers that us away from electronics so that filling the fogger does not accidentally get water on electrical systems.

And, houseplants can easily hide the utilitarian nature of the wire rack and equipment!
Fogger purchasing information
1 * Fogger
This is a top filled fogger with a 4 Liter reservoir